
3D printing
3D Printing Capabilities
Editor’s Note:
3D printing is the focus of this guest article by Anirudh, a mechanical engineer with extensive experience in the field. He offers a personal and practical look at how the technology has evolved. Drawing on his work in areas like food printing, soft robotics, and aerospace, he shares insights into gcode manipulation, embedded printing, and open-source innovation.
Over the past decade or two, the prevalence of 3D printing has improved dramatically as it grows in a variety of different fields. In this article we focus on a few advancements on the DIY printing and open-source software capabilities.
By the mid-2010s, most relevant Fused Filament Fabrication/ Fused Deposition Modeling (FFF/FDM) 3D printed related patents expired. This allowed for FDM based simple and cheap printers to really take off and become widespread.
This was just the beginning as the makers, hobbyists, and tinkerers were just getting their hands on this simple yet extremely versatile tool to try and make a variety of things in an open collaborative environment. The open-source nature of RepRap as a platform and the many free slicers that popped up like Slic3r, Prusa, Cura, etc set things in motion for a lot of organic development in the open-source community for various printer configurations and slicer settings.
I have had some personal experience with this as I worked with 3D printers to do unusual things.
Embedded 3D Printing
In my first job at Singapore University of Technology and Design (SUTD), I briefly worked on embedded 3D printing of polymers to make reinforced composite materials. A higher strength polymer representing the “fiber” was embedded in a substrate polymer in thin strands and then the setup was cured to create a composite. Slicers are not designed to “print” single lines in “mid air”, so the gcode had to be written from scratch.
I added extruder movement to a specific spot and a pause so that I can align the substrate container with the print. In fact, the gcodes generated from the STL files were so messy that I ended up writing a C++ code to generate the gcodes for fiber strands in different orientations.
Later, I extended this to use C++ programs to generate gcode for simple prints in FDM 3D printers as seen on my GitHub repository.
Food 3D Printing
I worked on developing food 3D printing at the Nanyang Technological University (NTU) and for my spin-off company Anrich3D. For the first iteration, I wrote the gcode from scratch to generate very simple movements. In subsequent iterations, I used the custom starting and ending gcode settings for different materials to provide the necessary pauses and purging every time the material was changed.
However other creators and hobbyists have gone much further in pushing the limits of 3D printing and unlocking new capabilities.
With some more tinkering with gcode alone, it is possible to print multiple parts one after the other without human intervention. A great example of this being used well is by the creator, Make Anything, in his video below about continuous production of 3D printed parts.
[embedded content]
Automated 3d printing by Make Anything.
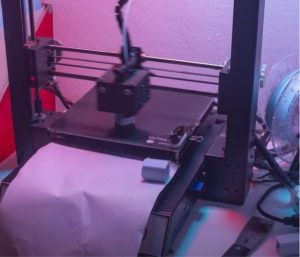
The process is simple:
Add a motion of the extruder to the end of the gcode that knocks the part off the print bed.
Copy and paste different gcode files for complete prints with the knock-off code included each time. This also takes care of homing the axes each time for the new print.
This can be done without adding any extra hardware except for the nozzle cleaning brush.
Conveyor belt automation by Swaleh.
However, if we are willing to add some new hardware and modify the printbed into a conveyor belt, then this automation can be enhanced even further into being more of a mass production machine. Swaleh Owais from Call me Swal, in his video below demonstrates how this can be achieved on a conveyor belt and the separation plate. Swaleh has explained in great detail how to follow the project step by step on his hackaday blog post.
[embedded content]
3D printing is always known for being able to make new very complex geometries possible. This has gone hand in hand with Topology Optimization and generative design techniques that make mathematically optimized shapes to minimize mass or maximize stiffness but were previously prohibitively difficult/expensive to manufacture.
But that is just regular 3D printing. In his video, Stefan from CNC Kitchen, explains how we can have customized/ load dependent infill based on the strength requirements of the part.
[embedded content]
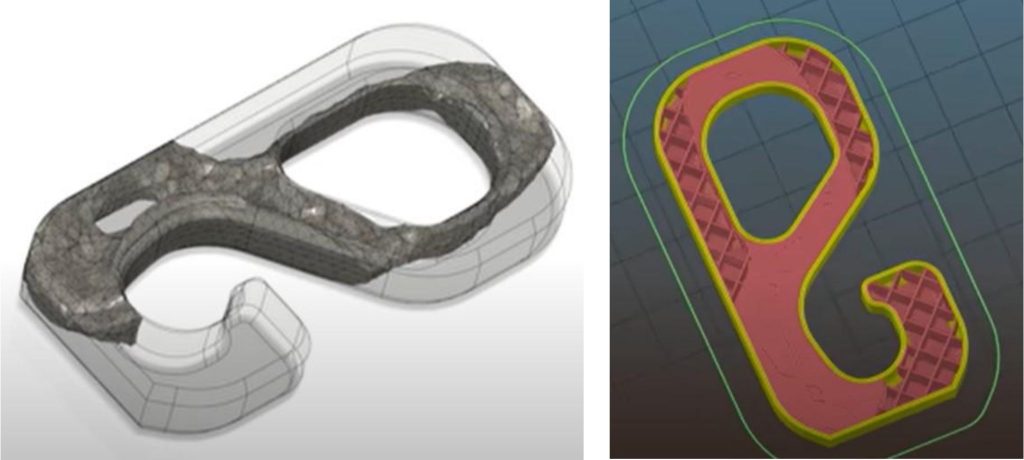
The idea is to create a shape optimized design in a simulation software of your choice, export it as an STL and use it as a load modifier for those critical parts of the original STL of the chosen part. We set 100% infill for the reinforced regions while we keep the default infill for the rest of the part. This way, the outer geometry of the part remains the same, while it gets internal reinforcements at the parts that would be under the most stress. Thus, we improve strength with less overall material use compared to simply increasing the infill percentage for the whole part. Stefan also explains a few other ways of implementing this in his video and you can check those out to see which one is easiest for you to implement for your model.
Left: Shape optimzed design using Fusion 360. Right: 2 parts sliced simultaneously showing load dependent infill. Images from CNC Kitchen’s YouTube videl linked earlier.
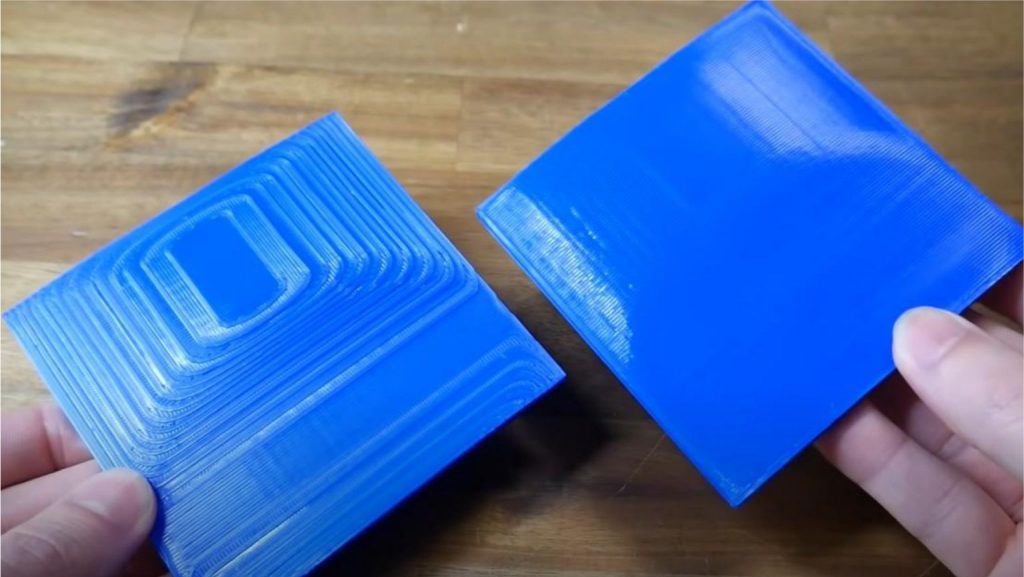
As we use lower resolutions or simply a shallow slope, we see a lot of layer lines or “staircases” in 3D printed parts. With traditional 3D printing, this is inevitable, however, Michael Laws from Teaching Tech, explains in his video how to implement truly 3 dimensional printing.
[embedded content]
This was derived from an earlier work by Tams Uham, which shows the basics of the method. The end result of this process is having much smoother curved surfaces and no visible staircases even with relatively lower resolution.
Difference between conventional printing showing the staircases vs the true 3 dimensional printing. Image from the Teaching Tech YouTube viode linked earlier.
This needs to be implemented on a Linux machine so please follow the installation steps from Michael’s video before getting to the slicer.
We first check the clearance of the nozzle tip to the extruder body. Clearance in height and in angle of the nozzle tip. The Slic3r slicer has a non-planar layers setting under layers and perimeters where the height and angle can be fed in. The gcode is then generated accordingly where the bottom layers are printed normally but the top surface layers move out of plane as all x,y,z coordinates change.
It is possible to add strength to very thin components by texturing them. This is the concept behind corrugated sheets and pipes. The slicer from Raise3D offers this feature to texture/emboss patterns on the surface of the 3D printed part.
Here is their guide on how to implement it on your own print.
Stefan’s video on CNC Kitchen (see below) explores how to implement these on thin parts to make them stiffer and reduce warping while printing. Due to the nature of FDM 3D printing, thin parts are especially prone to warping but adding textures on them makes a big difference in their printability and dimensional accuracy.
[embedded content]
3D printers today are capable of much more than just making physical objects from CAD files. There are several additional features available such as the ones in this article and many more as explained by all the YouTube channels mentioned in this article. 3D printing has taken a life of its own and has expanded into a vast collection of whimsical new features created by the curious minds who engaged with this versatile technology.
I’m sure this article whets your appetite for trying out some of these features or even looking up what more is possible with your own desktop 3D printer. It is always great to wonder but it can be overwhelming to try some of the more involved things mentioned here.
So, to get you started, I’d like to leave you with 10 things you could 3D print as gifts by Zach Freedman. Zach has explained each one in great detail and the links to the CAD models are available in his video description.
Enjoy!
About The Author
Anirudh is an accomplished mechanical engineer with extensive experience in 3D printing, mechanical design, and mechatronics. He has a BTech from Indian Institute of Technology (IIT) Roorkee and a Masters from National University of Singapore (NUS), both in Mechanical Engineering. His first job in Singapore University of Technology and Design (SUTD) was in soft robotics working with polymer composites to determine the effect of various reinforcements on material behaviour. The polymer composites were prepared using embedded 3D printing where he first extensively manipulated gcode for unconventional 3D printing. Later, he developed C++ programs to generate gcodes for different composite fiber orientations. He also used industrial FDM (Fortus 450mc), polyjet J750, and Formlabs SLA printers in his time in SUTD to get a good grasp of the potential of Additive Manufacturing. Anirudh’s most extensive experience with 3D printing has been at Nanyang Technological University (NTU) where he went with a proposal to commercialize food 3D printing as a spin-off technology. Food 3D printer head design was his NUS Master’s Thesis Project and he expanded on that in NTU developing 4 versions of food 3D printers from scratch working on everything from the mechanical design, fabrication, and actuation of the printers to the gcode and slicer modifications to suit the unconventional application of food 3D printing. He developed a few different configurations and extruder types (auger and plunger based) and accessories like the cartridge refiller and restocker. He founded Anrich3D Pte Ltd, a food 3D printing startup, spun off from his NTU research. Anirudh also developed several 3D printed dishes CAD and gcodes and showcased them in exhibitions around the world as shown on the Anrich3D website exhibitions page. Anirudh has also worked in satellite manufacturing at Galamad Aerospace where he worked with the Bambulabs X1 Carbon 3D printer and printed complex parts and assemblies with unconventional infills (like Gyroid Infill) and supports (like tree support). He also utilised the potential of 3D printing in aerospace by designing an Attitude Determination and Control System (ADCS) Chassis in fewer parts, thus reducing assembly, and a complex reduced mass design only feasible with 3D printing. The part was printed in Aluminium using Selective Laser Melting (SLM).
Editor’s Note:
3D printing is the focus of this guest article by Anirudh, a mechanical engineer with extensive experience in the field. He offers a personal and practical look at how the technology has evolved. Drawing on his work in areas like food printing, soft robotics, and aerospace, he shares insights into gcode manipulation, embedded printing, and open-source innovation.
Over the past decade or two, the prevalence of 3D printing has improved dramatically as it grows in a variety of different fields. In this article we focus on a few advancements on the DIY printing and open-source software capabilities.
By the mid-2010s, most relevant Fused Filament Fabrication/ Fused Deposition Modeling (FFF/FDM) 3D printed related patents expired. This allowed for FDM based simple and cheap printers to really take off and become widespread.
This was just the beginning as the makers, hobbyists, and tinkerers were just getting their hands on this simple yet extremely versatile tool to try and make a variety of things in an open collaborative environment. The open-source nature of RepRap as a platform and the many free slicers that popped up like Slic3r, Prusa, Cura, etc set things in motion for a lot of organic development in the open-source community for various printer configurations and slicer settings.
I have had some personal experience with this as I worked with 3D printers to do unusual things.
Embedded 3D Printing
In my first job at Singapore University of Technology and Design (SUTD), I briefly worked on embedded 3D printing of polymers to make reinforced composite materials. A higher strength polymer representing the “fiber” was embedded in a substrate polymer in thin strands and then the setup was cured to create a composite. Slicers are not designed to “print” single lines in “mid air”, so the gcode had to be written from scratch.
I added extruder movement to a specific spot and a pause so that I can align the substrate container with the print. In fact, the gcodes generated from the STL files were so messy that I ended up writing a C++ code to generate the gcodes for fiber strands in different orientations.
Later, I extended this to use C++ programs to generate gcode for simple prints in FDM 3D printers as seen on my GitHub repository.
Food 3D Printing
I worked on developing food 3D printing at the Nanyang Technological University (NTU) and for my spin-off company Anrich3D. For the first iteration, I wrote the gcode from scratch to generate very simple movements. In subsequent iterations, I used the custom starting and ending gcode settings for different materials to provide the necessary pauses and purging every time the material was changed.
However other creators and hobbyists have gone much further in pushing the limits of 3D printing and unlocking new capabilities.
With some more tinkering with gcode alone, it is possible to print multiple parts one after the other without human intervention. A great example of this being used well is by the creator, Make Anything, in his video below about continuous production of 3D printed parts.
The process is simple:
- Add a motion of the extruder to the end of the gcode that knocks the part off the print bed.
- Copy and paste different gcode files for complete prints with the knock-off code included each time. This also takes care of homing the axes each time for the new print.
This can be done without adding any extra hardware except for the nozzle cleaning brush.
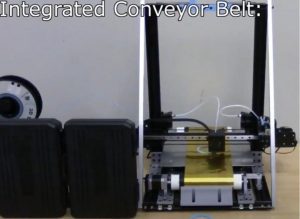
However, if we are willing to add some new hardware and modify the printbed into a conveyor belt, then this automation can be enhanced even further into being more of a mass production machine. Swaleh Owais from Call me Swal, in his video below demonstrates how this can be achieved on a conveyor belt and the separation plate. Swaleh has explained in great detail how to follow the project step by step on his hackaday blog post.
3D printing is always known for being able to make new very complex geometries possible. This has gone hand in hand with Topology Optimization and generative design techniques that make mathematically optimized shapes to minimize mass or maximize stiffness but were previously prohibitively difficult/expensive to manufacture.
But that is just regular 3D printing. In his video, Stefan from CNC Kitchen, explains how we can have customized/ load dependent infill based on the strength requirements of the part.
The idea is to create a shape optimized design in a simulation software of your choice, export it as an STL and use it as a load modifier for those critical parts of the original STL of the chosen part. We set 100% infill for the reinforced regions while we keep the default infill for the rest of the part. This way, the outer geometry of the part remains the same, while it gets internal reinforcements at the parts that would be under the most stress. Thus, we improve strength with less overall material use compared to simply increasing the infill percentage for the whole part. Stefan also explains a few other ways of implementing this in his video and you can check those out to see which one is easiest for you to implement for your model.
As we use lower resolutions or simply a shallow slope, we see a lot of layer lines or “staircases” in 3D printed parts. With traditional 3D printing, this is inevitable, however, Michael Laws from Teaching Tech, explains in his video how to implement truly 3 dimensional printing.
This was derived from an earlier work by Tams Uham, which shows the basics of the method. The end result of this process is having much smoother curved surfaces and no visible staircases even with relatively lower resolution.
This needs to be implemented on a Linux machine so please follow the installation steps from Michael’s video before getting to the slicer.
We first check the clearance of the nozzle tip to the extruder body. Clearance in height and in angle of the nozzle tip. The Slic3r slicer has a non-planar layers setting under layers and perimeters where the height and angle can be fed in. The gcode is then generated accordingly where the bottom layers are printed normally but the top surface layers move out of plane as all x,y,z coordinates change.
It is possible to add strength to very thin components by texturing them. This is the concept behind corrugated sheets and pipes. The slicer from Raise3D offers this feature to texture/emboss patterns on the surface of the 3D printed part.
Here is their guide on how to implement it on your own print.
Stefan’s video on CNC Kitchen (see below) explores how to implement these on thin parts to make them stiffer and reduce warping while printing. Due to the nature of FDM 3D printing, thin parts are especially prone to warping but adding textures on them makes a big difference in their printability and dimensional accuracy.
3D printers today are capable of much more than just making physical objects from CAD files. There are several additional features available such as the ones in this article and many more as explained by all the YouTube channels mentioned in this article. 3D printing has taken a life of its own and has expanded into a vast collection of whimsical new features created by the curious minds who engaged with this versatile technology.
I’m sure this article whets your appetite for trying out some of these features or even looking up what more is possible with your own desktop 3D printer. It is always great to wonder but it can be overwhelming to try some of the more involved things mentioned here.
So, to get you started, I’d like to leave you with 10 things you could 3D print as gifts by Zach Freedman. Zach has explained each one in great detail and the links to the CAD models are available in his video description.
Enjoy!
About The Author
Anirudh is an accomplished mechanical engineer with extensive experience in 3D printing, mechanical design, and mechatronics. He has a BTech from Indian Institute of Technology (IIT) Roorkee and a Masters from National University of Singapore (NUS), both in Mechanical Engineering. His first job in Singapore University of Technology and Design (SUTD) was in soft robotics working with polymer composites to determine the effect of various reinforcements on material behaviour. The polymer composites were prepared using embedded 3D printing where he first extensively manipulated gcode for unconventional 3D printing. Later, he developed C++ programs to generate gcodes for different composite fiber orientations. He also used industrial FDM (Fortus 450mc), polyjet J750, and Formlabs SLA printers in his time in SUTD to get a good grasp of the potential of Additive Manufacturing. Anirudh’s most extensive experience with 3D printing has been at Nanyang Technological University (NTU) where he went with a proposal to commercialize food 3D printing as a spin-off technology. Food 3D printer head design was his NUS Master’s Thesis Project and he expanded on that in NTU developing 4 versions of food 3D printers from scratch working on everything from the mechanical design, fabrication, and actuation of the printers to the gcode and slicer modifications to suit the unconventional application of food 3D printing. He developed a few different configurations and extruder types (auger and plunger based) and accessories like the cartridge refiller and restocker. He founded Anrich3D Pte Ltd, a food 3D printing startup, spun off from his NTU research. Anirudh also developed several 3D printed dishes CAD and gcodes and showcased them in exhibitions around the world as shown on the Anrich3D website exhibitions page. Anirudh has also worked in satellite manufacturing at Galamad Aerospace where he worked with the Bambulabs X1 Carbon 3D printer and printed complex parts and assemblies with unconventional infills (like Gyroid Infill) and supports (like tree support). He also utilised the potential of 3D printing in aerospace by designing an Attitude Determination and Control System (ADCS) Chassis in fewer parts, thus reducing assembly, and a complex reduced mass design only feasible with 3D printing. The part was printed in Aluminium using Selective Laser Melting (SLM).
Source: mechanical-engineering.com